
I’m currently diving a bit deeper into Apache Airflow and want to further my understanding of the system. I chose to install it locally on my Mac because a managed service like Managed Workflows for Apache Airflow (MWAA) on AWS limits how much I can tinker with the system. For anything remotely production-related, I’d still go with the managed service.
I used the Airflow: Getting Started documentation to do exactly that, getting started. Now you might wonder: why write this post then? I found that I had some trouble getting things to work on MacOS specifically, so this is for everyone out there who’s trying to do this on a Mac.
We begin by installing Airflow using the shell template provided in the documentation after creating and activating a separate virtual environment in my project directory (~/projects/airflow) like this: python3.12 -m venv .venv and source .venv/bin/activate. You don’t have to use Python 3.12, but at the time of writing this, it’s the current Python release, so I’m using it. Next, we edit the shell code template from the docs and use it to install Airflow into the virtual environment.
AIRFLOW_VERSION=2.9.3
PYTHON_VERSION=3.12
CONSTRAINT_URL="https://raw.githubusercontent.com/apache/airflow/constraints-${AIRFLOW_VERSION}/constraints-${PYTHON_VERSION}.txt"
pip install "apache-airflow==${AIRFLOW_VERSION}" --constraint "${CONSTRAINT_URL}"
Feel free to use a different version of Airflow. At the time of writing this, 2.9.3 is the current version. Next, I used pip install 'apache-airflow[amazon]' to install the provider that enables me to interact with AWS. You don’t need that if you don’t plan to use AWS stuff.
Since I want to be able to have all my DAGs in the project directory, I’m setting the environment variable AIRFLOW_HOME to ~/projects/airflow. I’m also setting the environment variable NO_PROXY to *, which was a crucial step to get the connection to AWS working. Now we’re ready to start Airflow in standalone mode, which means it will use SQLite to store the metadata and the SequentialExecutor to run DAGs, neither of which is recommended for production use. As I said, production is going to be using MWAA anyway. Time to start Airflow.
airflow standalone
This will take a little bit longer on the first start because it sets up the database, etc.; subsequent starts are a lot quicker. It will then launch the Airflow UI on port 8080. You’ll probably see a few popups asking you if Python should be allowed to open these ports (yes, it should). You can go to http://0.0.0.0:8080 in your browser and log in. The username will be admin, and the password will be written to the file standalone_admin_password.txt, but you can also see it in the logs during the initial setup.
Now, we’re ready to create our DAGs in the dags directory. Before we can talk to AWS, we should probably configure the AWS connection a bit. The documentation for that can be found here. In my case, I used the UI and navigated to Admin -> Connections and clicked on the edit button next to aws_default. I left most values as they were and just added some extra configuration in the form of a JSON document.
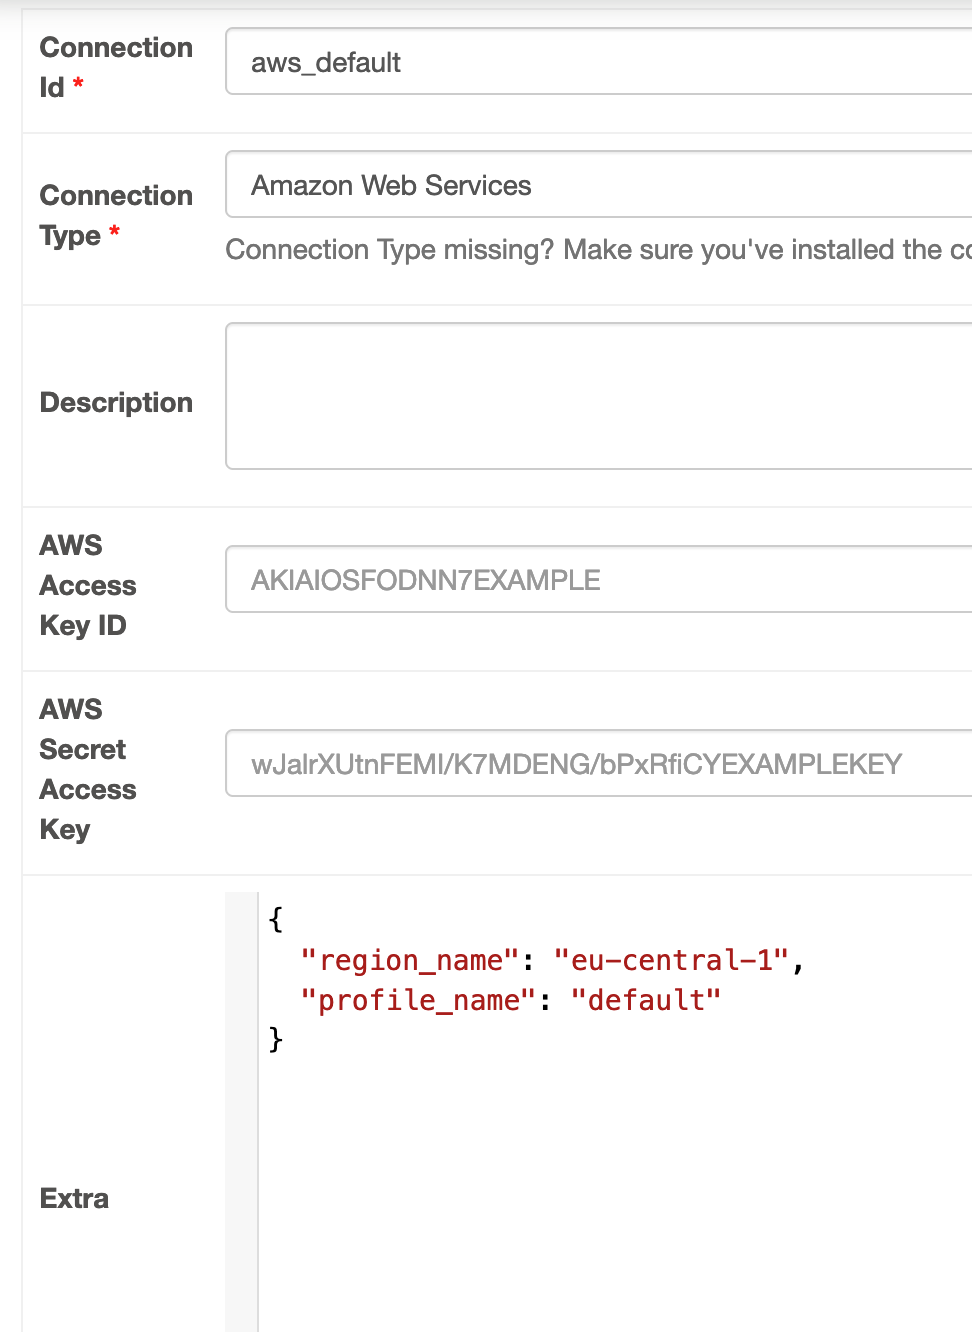
Here I’m telling it to talk to the endpoints in Frankfurt by default and also use the default profile that’s configured in ~/.aws/config for credentials. Next I saved the connection and used the CLI to test it.
$ airflow connections test aws_default
Retrieving connection: 'aws_default'

Testing...

Connection success!
You can also do that through the UI, but only if you update the airflow.cfg and set the parameter test_connection to Enabled (or do the same with the AIRFLOW__CORE__TEST_CONNECTION environment variable). However, you should be aware that this may have security implications, which are clearly explained in the config file.
So, why did I write this down? The main thing is the small detail where I tell you to set NO_PROXY to *. If you don’t, you may see error messages like these if you talk to AWS services or do some things in the UI (like testing AWS connections).
webserver | [2024-08-16T10:31:37.623+0200] {base.py:84} INFO - Using connection ID 'CbFN4w6N' for task execution.
webserver | [2024-08-16 10:31:37 +0200] [43448] [ERROR] Worker (pid:14852) was sent SIGSEGV!
webserver | [2024-08-16 10:31:37 +0200] [15648] [INFO] Booting worker with pid: 15648
I don’t fully understand why this is the case, but there are several issues on Github et al. that point this out as a workaround. If you know what you’re googling for, you’ll find them, but it took me a while, so I decided to write this.
Anyway, these should be plenty of backlinks to the original resources that I encountered. Hopefully, this helps you set up your own local dev environment for Airflow.
— Maurice
Title Image by Call Me Fred on Unsplash