
Introduction
In the last article I introduced you to the Click library and we built a simple calculator with input validation. Today we’re going to expand a little on that. We’ll still build a calculator to start off with, because it allows me to introduce some of the slightly more advanced features that Click offers in a familiar context.
You can find all of the code in this article in this repository on Github.
Command Groups
The first article introduced the @click.command decorator to create a CLI.
That allowed us to create a single command that could be executed when invoking the script.
Now we’re going to expand on that with command groups.
As the name suggest, they allow us to group multiple commands for a CLI and thereby improve its usefulness.
For an example I’ve implemented the calculator we built in the first article in a different way, let’s take a look at the help page to see what has changed.
$ python calculator_cli_v2.py --help
Usage: calculator_cli_v2.py [OPTIONS] COMMAND [ARGS]...

  This is a calculator that supports basic arithmetic operations.

Options:
  --help  Show this message and exit.

Commands:
  add       Returns the sum of ADDENDS.
  divide    Returns DIVIDENT / DIVISOR.
  multiply  Returns the product of a list of FACTORS.
  subtract  Returns the difference between MINUEND and SUBTRAHEND.
As you can see our calculator now offers multiple commands and each of those even has its own help page and parameters, e.g.:
$ python calculator_cli_v2.py divide --help
Usage: calculator_cli_v2.py divide [OPTIONS] DIVIDENT DIVISOR

  Returns DIVIDENT / DIVISOR.

Options:
  --help  Show this message and exit.
The way this is implemented is relatively simple as well, I’m going to show you an excerpt of the program:
@click.group()
def cli() -> None:
    """
    This is a calculator that supports basic arithmetic operations.
    """

@click.command()
@click.argument("addends", type=click.INT, nargs=-1)
def add(addends: typing.Tuple[int]) -> None:
# ...

@cli.command()
@click.argument("minuend", type=click.INT)
@click.argument("subtrahend", type=click.INT)
def subtract(minuend: int, subtrahend: int) -> None:
# ...

if __name__ == "__main__":
    cli.add_command(add)
    cli()
Essentially we define an entrypoint function with the @click.group decorator - in our case the cli() function.
We can then add commands to this group in two ways:
- Use the
@click.commanddecorator on a function to define our regular command and later runcli.add_command(add)to add the command to our group. - Use the
@cli.commanddecorator to explicitly tell a function that it is a command in our group that’s defined by thecli()function. If your entrypoint has a different name, replacecliwith it.
The name of the command will be generated dynamically from the function name by default and underscores in the name are replaced by hyphens.
If you want to specify the name of the command yourself, you can also pass in the name argument to your decorator, e.g.:
@click.command(name="memorable-command-name")
def less_than_intuitive_function_name() -> None:
    """Fancy function"""
This allows you to decouple the function name from the command name, which is a good thing, because those have different target audiences.
Input validation is important when processing arbitrary user input in order to guarantee your program does what it’s supposed to do.
In the first article I introduced the basic input validation that click offers through the type attribute.
If we want to go beyond that, we can use custom validators which I’m going to show you next.
Custom input validation
The subcommand that returns the quotient of two integers demonstrates another powerful feature of Click - custom input validation.
You’re probably aware, that you can’t divide by Zero1 so we need to make sure that the divisor is any integer but 0.
This is not part of the basic integer validation we do for the divident with the type=click.INT parameter, so we need to write our own.
That’s where callbacks come in. The callback parameter on the argument decorator (and the option decorator for that matter) allows you to specify a callable which will be invoked to parse and validate the value that the user supplied.
@cli.command()
@click.argument("divident", type=click.INT)
@click.argument("divisor", callback=validate_divisor)
def divide(divident: int, divisor: int) -> None:
    """Returns DIVIDENT / DIVISOR."""
    click.echo(f"{divident} / {divisor} = {divident/divisor}")
In our example the validate_divisor function is responsible for doing that.
It’s shown in the following listing.
The validation callback receives three inputs:
- An instance of
click.core.Contextwhich holds state information about Click (docs) - you probably won’t need it - An instance of
click.core.Argumentwhich gives you access to metadata about the argument you’re validating - The value that the user supplied as a
str
def validate_divisor(ctx: click.core.Context,
                     param: click.core.Argument, value: str) -> int:
    """
    Validation logic for the divisor, ensures it can be
    converted to an int and isn't 0
    """

    try:
        value_as_int = int(value)

        if value_as_int == 0:
            raise click.BadParameter("Can't divide by Zero!")

        return value_as_int
    except ValueError:
        raise click.BadParameter(
                "Expected something that can be parsed to int.")
The validation itself only cares about the value in our case.
It tries to cast it as an integer and afterwards checks that it isn’t 0.
If any of these validations/checks fail, we raise a click.BadParameter exception (docs) which gives us a nicely formatted error message.
Anything the callback returns will become the value that the command receives, in our case we cast the string to an integer and return that.
Sometimes you have the requirement for commands to accept an arbitrary list of values and do some processing on that. We’re going to cover this use case next.
List of values as arguments
The subcommand that is responsible for returning the sum of a list of arbitrary integers is shown below.
As you can see from the type hints, it receives a tuple of integers as the addends parameter.
The argument uses the nargs=-1 parameter on the argument decorator, which essentially means, that this argument holds an unspecified number of values.
You could also use this to specify, that an argument holds exactly n values if you like.
In that case you’d set nargs=n and Click will enforce that the tuple has exactly n values of the specified type.
@cli.command()
@click.argument("addends", type=click.INT, nargs=-1)
def add(addends: typing.Tuple[int]) -> None:
    """
    Returns the sum of ADDENDS.
    """
    click.echo(
        f'{ " + ".join([str(x) for x in addends])} = {sum(addends)}')
The code itself then just uses the sum() built in function to sum the list of values and displays them in a pretty formatted string.
You can also combine the argument lists with regular arguments such as in this example:
@cli.command()
@click.argument("addends", required=True, type=click.INT, nargs=-1)
@click.argument("divisor", callback=validate_divisor)
def add_and_divide(addends: typing.Tuple[int], divisor: int) -> None:
    """Returns sum(ADDEDENDS) / Divisor"""

    addends_str = " + ".join([str(x) for x in addends])
    result = sum(addends) / divisor

    click.echo(f'({ addends_str}) / {divisor} = {result}')
Here I’ve implemented a command that first sums an arbitrary list of integers and then divides that by a divisor.
To achieve this behavior, I’ve made the addends argument required and set the nargs=-1 parameter just like we learned above.
This means the tuple in the addends parameter will always have at least one value.
The divisor argument that I’ve also added will be evaluated after the addends parameter, which means that the last value in the arbitrary list of integers will become our divisor.
We still don’t want this value to be 0, that’s why I’ve kept the custom validation that we introduced earlier.
Describing this seems a little weird, let’s look at an example that hopefully clears up what I’ve tried to describe.
$ python calculator_cli_v2.py add-and-divide 1 2 3 2
(1 + 2 + 3) / 2 = 3.0
If you want to combine the list of arguments with custom validation, you should be aware that the callback will be invoked with the tuple of values and not each individual value.
Calculator v2 Demo
Now that we’ve looked at quite a few parts of our calculator code, let’s see the new version in action.
That’s enough about calculators for today, let’s take a look at another common CLI pattern and how to build it.
Multi-level CLI structures
If you’ve used CLIs before, you’ve probably come across these some time in the past.
A well known example of these is the AWS CLI, which has a command pattern that looks like this: aws <service> <action>.
Essentially these CLIs represent a tree structure with an in principle arbitrary depth.
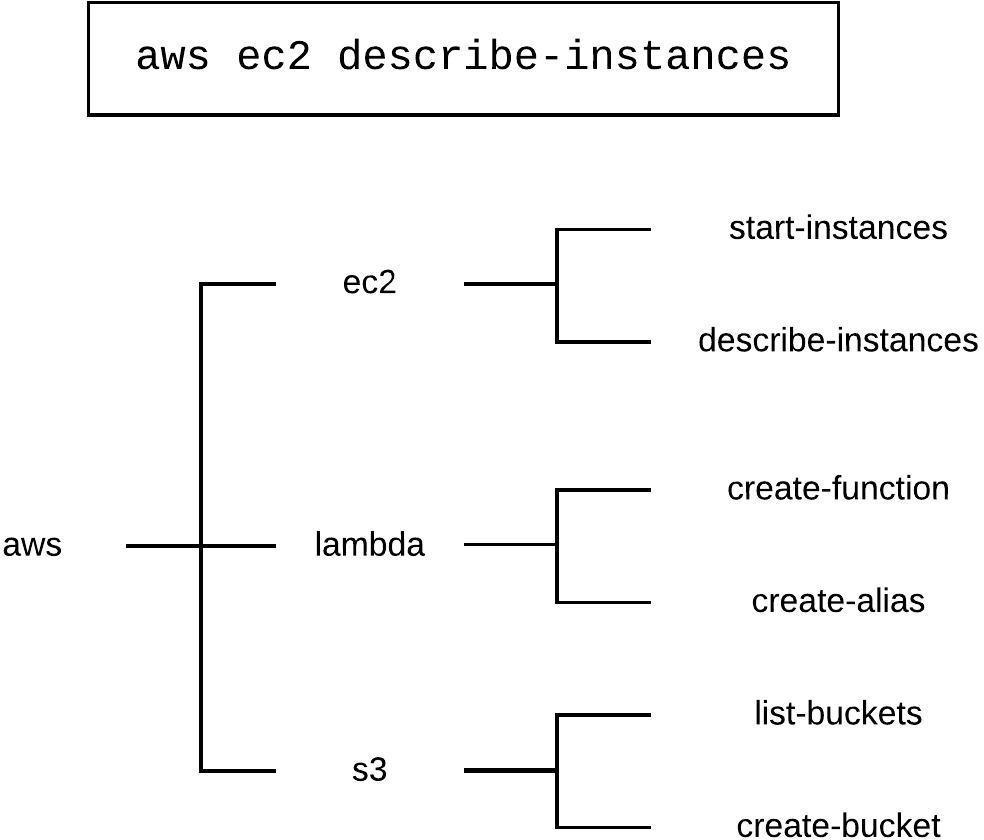
You can build these easily using Click as well. The key concept to create them are the command groups we’ve learned about earlier in this article. Earlier I claimed, that command groups are essentially a kind of container for commands, which is correct. It’s not the full story though, they are also a container for command groups, which allows us to build a multi level CLI.
@click.group("first-level")
def cli() -> None:
    """Top level"""

@cli.group("second-level-1")
def second_level_1() -> None:
    """Second level 1"""

@cli.group("second-level-2")
def second_level_2() -> None:
    """Second level 2"""

# ...

@second_level_2.command()
def third_level_command_3() -> None:
    """Third level command under 2nd level 2"""

if __name__ == "__main__":
    cli()
The hierarchy is built up using the decorators.
We start with the top level and the @click.group decorator on the cli() function.
Below that two second level groups are registered using the @cli.group decorator.
On the third level we use something like the @second_level-2.command decorator to specify which level/group our commands belong to.
Doing that is fairly simple.
Multi-Level Demo
Let’s look at the multi-level CLI I showed you above in action.

Conclusion
In this post we’ve talked about a few of the more advanced features that Click offers: command groups, custom input validation, argument lists and multi-level CLI structures. I hope this article was interesting to you and you learned something new. Thank your for reading this till the end! I’d love to get your feedback, questions, and/or comments via Twitter (@maurice_brg).
References
- Code on Github
- Title image courtesy of Liam Briese on Unsplash.