
Introduction
In the past two articles I first introduced you to Click and then expanded on that with some of the more advanced patterns it allows you to use. If you haven’t read them, I suggest you take a look at them first. In this post I’m going to show you some of the quality of life improvements Click offers to us as developers when building CLIs. I’ll show you how easy it is to use Click for text styling, how to create beautiful and simple progress bars and also multiple ways you can handle user interaction and input.
If you’re interested in the code, you can find it in the same Github repository as that for the last two articles.
Text styling
A common criticism of command line interfaces is the fact, that they make it difficult to discover important information, because it almost always looks like a wall of text.
That’s because CLIs are limited to text as the medium to interface with the user.
If text is our medium to convey information to our users, we can use it to draw attention to important sections through either formatting or styling the text.
Text styling in most Unix based operating systems works based on weird escape sequences1 such as this one: \e[1m which will make text following it bold or \e[91m which will change the text color to light red.
You really don’t want to mess with them, because they’re annoying to work with.
Fortunately Click makes things easy for us as developers.
It has a couple of functions that wrap the underlying magic and abstract it away for us2.
The click.style function is the main protagonist here.
You can style a text in a variety of ways - set the foreground color with the fg parameter, the background with bg, make the text bold with the bold or underlined with underline parameters.
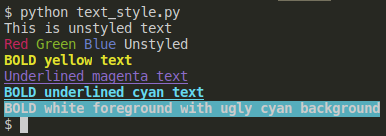
I’ve created a few examples of styled text here:
import click

if __name__ == "__main__":
    click.echo("This is unstyled text")
    click.echo(
        click.style("Red ", fg="red") +
        click.style("Green ", fg="green") +
        click.style("Blue ", fg="blue") +
        "Unstyled"
    )

    click.secho("BOLD yellow text", fg="yellow", bold=True)
    click.secho(
        "Underlined magenta text", fg="magenta", underline=True)
    click.secho(
        "BOLD underlined cyan text",
        fg="cyan", bold=True, underline=True)

    click.secho(
        "BOLD white foreground with ugly cyan background",
        bold=True, bg="cyan")
If you want to combine multiple styles in a single text, you need to apply the styles individually and concatenate the result.
Since applying a style and printing the result with click.echo() is a very common pattern, you can use click.secho() to do that in a single command, i.e. have the option to apply colors etc. and then print the result.
The code above leads to text like this:
Now that we’ve learned, how to make colorful text, to draw attention to key pieces of information, let’s talk about one of the - in my opinion - coolest features of Click: Progress Bars.
Progress Bars
Colors and text styling help to focus the users attention on what matters and progress bars gives them an indication how long a specific action takes. Turns out that progress bars are surprisingly old and are derived from Gantt Charts according to Wikipedia. The first modern graphical progress bar appeared in 1979 and since then they have proven very useful to indicate visually how much of a task has been completed. Making CLI based progress bar isn’t that easy, except when you use Click. The library has a really cool implementation of progress bars that I’m going to show you now.
Progress Bar for iterables
If you’re processing items in an iterable, e.g. a list, click has a very simple way to create a progress bar for that with the click.progressbar function.
It can act as a contextmanager and replace your original iterable.
When you iterate over the new iterable, the progress bar will magically progress based on how far you’ve come in the iterable.
This is an abstract description, let me show you an example:
def progress_over_iterable():
    """
    Demonstrates how a progress bar can be tied to processing of
    an iterable.
    """

    # Could be a list, tuple and a whole bunch of other containers
    iterable = range(256)

    label_text = "Processing items in the iterable..."

    with click.progressbar(iterable, label=label_text) as items:
        for item in items:
            # Do some processing
            time.sleep(0.023) # This is really hard work
We have our incoming iterable, in this case a range of values from 0 to 255.
Then we basically wrap that with the click.progressbar contextmanager and alias that to items.
Afterwards we can iterate over the items and will get a nice progress bar, which I’ll show you now.
The animation actually showed two progress bars -the default one without colors and a second one that’s more colorful. The second one was created with this code:
def progress_over_iterable_with_colors():
    """
    Demonstrates how a progress bar can be tied to processing of
    an iterable - this time with colorful output.
    """

    # Could be a list, tuple and a whole bunch of other containers
    iterable = range(256)

    fill_char = click.style("#", fg="green")
    empty_char = click.style("-", fg="white", dim=True)
    label_text = "Processing items in the iterable..."

    with click.progressbar(
            iterable=iterable,
            label=label_text,
            fill_char=fill_char,
            empty_char=empty_char
        ) as items:
        for item in items:
            # Do some processing
            time.sleep(0.023) # This is really hard work
As you can see, it’s possible to customize the fill char and empty char in the progress bar with your own values.
These values can even have text styling applied to them as I’ve described above.
As you’ve also seen, Click provides an estimate of how long this operation is going to take by default.
If you don’t like it, you can just pass show_eta=False to the progress bar constructor to disable that.
For more details about the customization options, I suggest you take a look at the API documentation.
Progress bars without iterables
If you’re not iterating over a list or something like that, you can still make use of click to create progress bars for you.
In that case you’ll need to create the progress bar with the length parameter present.
The call itself looks similar to the examples with iterables only that the contextmanager doesn’t return an iterable, but an instance of the ProgressBar class.
To advance the progress bar, you need to call the update method on it and specify the amount of steps to progress.
Here’s sample code for that.
def progress_bar_without_iterable() -> None:
    """
    Demonstrates a progress bar without an iterable to
    iterate over.
    """

    with click.progressbar(label="Processing",
                           length=100,
                           show_eta=False) as progress_bar:
        click.echo("Starting progress bar")
        progress_bar.update(0)
        time.sleep(1.01)
        progress_bar.update(25)
        time.sleep(1.25)
        progress_bar.update(25)
        time.sleep(2)
        progress_bar.update(25)
        time.sleep(3)
        progress_bar.update(25)
Note: The progress bar is designed for processes that take a few seconds per the documentation and as a result of that quick calls to the update method won’t necessarily update the progress bar immediately.
Prompts for confirmation, input and options
Interacting with users from the command line point of view in Python usually means making use of the built in input() function.
Unless you’re using Click, which offers a few handy helpers that come with a lot of features.
Asking for confirmation
Whenever the user wants to do something potentially destructive, we should consider asking them to confirm they’re sure they want to do that.
Since this is a common use case, Click comes with the handy click.confirm helper.
Here’s a simple example, where the message for the confirmation is printed and the result stored as a boolean in the variable confirmed.
It basically translates the user input to a boolean variable.
def confirm_as_variable() -> None:
    """Asks the user for confirmation and stores the response in a variable"""

    confirmed = click.confirm("Are you sure you want to drop the users table?")
    status = click.style("yes", fg="green") if confirmed else click.style("no", fg="red")
    click.echo("Drop table confirmed?: " + status)
This is how it looks in action:
$ python prompts.py confirm-as-variable
Are you sure you want to drop the users table? [y/N]: n
Drop table confirmed?: no
$ python prompts.py confirm-as-variable
Are you sure you want to drop the users table? [y/N]: y
Drop table confirmed?: yes
If you’re not really interested in dealing with the case where the user doesn’t confirm and just want to terminate the program, that’s easy as well.
By passing the abort=True parameter to the confirm function it will raise the click.Abort exception and terminate the program.
The exception is handled gracefully by click, so all the user sees is an “Aborted” text.
def confirm_with_abort() -> None:
    """Asks the user for confirmation and aborts if that doesn't happen."""

    click.confirm(
        "Are you sure you want to drop the users table?",
        abort=True
    )

    click.echo("We have gotten to this point, so the user has confirmed.")
This is how that looks:
$ python prompts.py confirm-with-abort
Are you sure you want to drop the users table? [y/N]: y
We have gotten to this point, so the user has confirmed.
$ python prompts.py confirm-with-abort
Are you sure you want to drop the users table? [y/N]: n
Aborted!
Asking for user input
When the inputs we require go beyond a simple confirmation, Click has the click.prompt() function to capture the type of information from our users we need.
Let’s build a very basic user sign up workflow with that:
@cli.command()
def prompt() -> None:
    """Shows examples for the use of click.prompt"""

    username = click.prompt(
        text="Please enter a username",
        type=click.STRING
    )
    password = click.prompt(
        text="Please enter a new password",
        hide_input=True,
        confirmation_prompt=True
    )
    newsletter_subscription = click.prompt(
        text="Would you like to subscribe to our newsletter?",
        default=False,
        type=click.BOOL
    )
    favorite_color=click.prompt(
        text="What is your favorite color?",
        type=click.Choice(
            ["blue", "green", "yellow"],
            case_sensitive=False
        )
    )

    click.echo(
        f"Username: {username} | Password: {'*' * len(password)} | "
        + f"Newsletter: {newsletter_subscription} | Favorite color: "
        + click.style(favorite_color, fg=favorite_color)
    )
First we ask for the username, which is the most basic form of prompt - the type attribute isn’t really required here, since string is the default.
The next piece of information we’re interested in is the password, for security purposes we don’t display it in the terminal, but hide the keyboard input.
In order to avoid typos (which are more likely since the users can’t see what they type), the confirmation_prompt parameter asks the user to enter the same password twice.
The newsletter_subscription is an input, which is similar to the click.confirm function - it asks for a boolean and takes False as the default if no input is provided.
This will accept inputs like “yes” or “no” as well, so it’s a little bit smart.
The favorite color is usually not something we ask our users about, but in this case I want to highlight how you can use the click.Choice type to only allow values from a predefined list of inputs.
In the end we just print out the information the user has entered, although the password will be replaced by asterisks in order to keep it hidden (unless your password is literally a string of asterisks).
So far these examples have dealt with getting user input while we’re executing a command, but we can also use this to get a value for options in our commands, which I’m going to describe next.
Prompting for options
When we add options to our command, we can make them mandatory by passing in the required=True parameter on the decorator.
Mandatory options that aren’t given by the user will raise an error and the command won’t execute.
We can handle this a little more gracefully by prompting for the options that the user doesn’t explicitly set.
Using Click this is very easy and the following listing is an example of that.
@cli.command()
@click.option("--username", prompt=True)
@click.password_option()
@click.option("--age", prompt="How old are you?", type=click.INT)
def option_prompt(username: str, password: str, age: int) -> None:

    click.echo(f"Username: {username}")
    click.echo(f"Password: { '*' * len(password)}")
    click.echo(f"Age: {age}")
The command that is shown here has three options - the first is a basic username option, which has the additional prompt=True parameter.
Setting it to true, makes the command ask the user for the Username value.
The click.password_option decorator asks the user for a password and makes them confirm it, while not displaying the characters the user types in.
It works similar to the behavior I have described in the section above.
The third option also has the prompt parameter, but in this case I’ve customized the prompt message, to make it more user friendly. When we execute the command it looks like this:
$ python prompts.py option-prompt
Username: maurice_brg
Password:
Repeat for confirmation:
How old are you?: 25
Username: maurice_brg
Password: *
Age: 25
By passing in an option explicitly, we can skip the prompt.
$ python prompts.py option-prompt --username maurice_brg
Password:
Repeat for confirmation:
How old are you?: 25
Username: maurice_brg
Password: ***
Age: 25
Conclusion
In this article I explained to you, how to use Click to style your texts in terminals, build various types of prompts and also how Click makes it easy to create a nice progress bar for your CLI. I hope this article was interesting to you and you learned something new. Thank your for reading this till the end!
I’d love to get your feedback, questions, and/or comments via Twitter (@maurice_brg)!.
References
- Code on Github
- Title image courtesy of Liam Briese on Unsplash.
By weird escape sequences I’m refering to the ANSI/VT100 Control sequences for which these are interesting references: Wikipedia and this manual on how to use them. ↩︎
For colorful text on windows you also need to install the
coloramapackage from pypi as described in the Click documentation ↩︎